MailMessage msg = new MailMessage();
msg.From = new MailAddress("address@domain.com", "Person's Name");
msg.To.Add(new MailAddress("destination@domain.com",
"Addressee's Name");
msg.To.Add(new MailAddress("destination2@domain.com",
"Addressee 2's Name");
msg.Subject = "Message Subject";
msg.Body = "Mail body content";
msg.IsBodyHtml = true;
msg.Priority = MailPriority.High;
SmtpClient c = new SmtpClient("mailserver.domain.com");
c.Send(msg);
Monday, December 18, 2006
Friday, August 25, 2006
A Single Sign-in Web Service in ASP.NET
Most of today's sites require users to undertake a registration process to allow the site owners to keep in touch with, or offer services to, those visitors. Building up a user base like this requires patience and dedication. Offer a new service or a new Website, however, and, typically, you'll need to start your user base from scratch yet again.
This article outlines a strategy for creating portable membership tools. We'll see how Web Services and server controls give you ability to produce a single sign-in for all your sites and resources.
The Challenge
The notion of a single sign-in for a Website has been around for years. Most notably, Microsoft's implementation in the form of the .NET Passport, and the Liberty Alliance Project (backed by big hitters like Visa and GM), have had moderate success in saving users and developers from the issues of site membership.
However, the license fees of systems like Passport put it out of the reach of many Web developers. Passport, for example, costs $10,000 a year and an additional $1,500 compliance fee per URL.
While the tools outlined in this article won't give you all the advantages of using Passport (most notably, Passport's 200 million-strong user base, or its security), the solution we'll discuss does offer a simple method of organising your user base over multiple sites or resources.
Architecture
The design of the tools needs to be such that we can create separate applications -- even non-.NET applications -- and still access and authenticate our user base.
Web Services
The heart of the login system is a Web service. A Web service allows you to extract and distribute specific functionality of your applications so that it can be reused by other applications, even if they aren't written in .NET. This provides the perfect platform for our login system, affording us the flexibility to produce some of our sites as non-.NET applications; for example, PHP, ASP, or JSP. We can even write desktop applications to include our login functionality.
Database Design
A database will contain information for all our users, and is queried by the Web service to authenticate, locate, and return users to our applications. As only the Web service will communicate with the database directly, our applications will not need to know how to access the database, nor deal with SQL statements.
The Member Object
The Web service will use a Member object defined by us to represent a user of our site. This object will give us access to the details of the currently signed-in user.
User Controls
After we produce our Web service, we can build some ASP.NET user controls that encapsulate the common functionality of user registration and authentication. The user controls will communicate with the Web service, presenting us with simple properties and events to control the membership of our site.
Designing the Login Web Service
The Web service needs to encapsulate all the functionality we'll require to register and authenticate a user; hence it will require the following methods:
bool createUser(Member m)
Member authenticateUser(string userName, string password)
Of course, this isn't all the functionality that's possible. We could, for example, have methods to control the modification of a user, the loss of a password, or the removal of a user from our system. However, this article will concentrate on creation and authentication.
Both of the methods reference an object, Member. This class will represent a user; it contains all the information we know about the user we're dealing with. The class will have the following properties:
string userName;
string hashedPassword;
string emailAddress;
string fullName;
Here's the C# source code for this class. There's nothing fancy here, just code for the four properties:
namespace Sitepoint.SingleLogIn
{
public class Member
{
private string _UserName;
private string _Password;
private string _FullName;
private string _EmailAddress;
public string UserName
{
get
{
return _UserName;
}
set
{
_UserName = value;
}
}
public string Password
{
get
{
return _Password;
}
set
{
_Password = value;
}
}
public string EmailAddress
{
get
{
return _EmailAddress;
}
set
{
_EmailAddress = value;
}
}
public string FullName
{
get
{
return _FullName;
}
set
{
_FullName = value;
}
}
}
}
To create a user on our system, we first create an instance of the Member class and fill it with the personal information for the user. We then pass this to the createUser method on the Web service. This returns true for a successful addition, and false if a problem is found with the information (for example, if the username already exists).
To authenticate a user, we pass that user's username and password to the Web service and, if these details are authenticated, a Member object representing the user is returned.
A database table will be used to store our user details. The fields of this table will correspond to the user information:
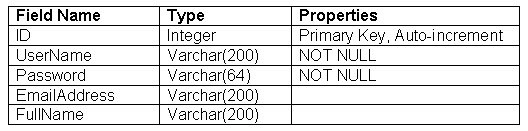
Hence, the SQL we'll use to create the table is as follows:
CREATE TABLE User
{
ID int IDENTITY (1,1) NOT NULL,
UserName varchar(200) NOT NULL,
Password varchar(64) NOT NULL,
EmailAddress varchar(200),
FullName varchar(200)
}
With the database created, and our Member class coded, we can now flesh out the methods in the Web service to include our functionality.
The createUser method will first check to see if the username contained within the passed Member object has been registered before (implemented in the private method userExists). If it has, the method will return false. If all is well, however, the user can be added to the database (through the private method addUser).
All passwords are stored as hashes of the original password for the sake of security. As we'll see with the server controls, this functionality is encapsulated. However, if we weren't using the controls -- say we created a non-.NET or desktop application – we'd need to remember that plain text passwords cannot be passed over the network connection.
[WebMethod]
public bool createUser(Member m)
{
//check that the username doesn't already exist
if (!userExists(m.UserName))
{
return false;
}
//add the user
if (!addUser(m))
{
return false;
}
return true;
}
private bool userExists(string UserName)
{
conn.Open();
SqlCommand comm = new SqlCommand("select id from User where username = @username",conn);
SqlParameter p = new SqlParameter("@username",UserName);
comm.Parameters.Add(p);
SqlDataReader r = comm.ExecuteReader();
bool result = r.HasRows;
conn.Close();
return result;
}
private bool addUser(Member m)
{
conn.Open();
SqlCommand comm = new SqlCommand("insert into User(UserName, Password, FullName, EmailAddress) values (@username, @password, @fullname, @emailaddress)",conn);
SqlParameter pUserName = new SqlParameter("@username",m.UserName);
SqlParameter pPassword = new SqlParameter("@password",m.Password);
SqlParameter pFullName = new SqlParameter("@fullname",m.FullName);
SqlParameter pEmailAddress = new SqlParameter("@emailaddress",m.EmailAddress);
comm.Parameters.Add(pUserName);
comm.Parameters.Add(pPassword);
comm.Parameters.Add(pFullName);
comm.Parameters.Add(pEmailAddress);
int result = comm.ExecuteNonQuery();
//we should have 1 result returned. else, it failed
return (result ==1);
}
The authenticateUser method is the meat of our service. By passing a username and a hashed password of the user (taken from a Web form, for example) a Member object that represents the user is returned. The method queries the database to see if a row exists that contains both the username and the password. If a row is found, the user is authenticated, and the object is created from the row. Otherwise, we've been given incorrect credentials, and a null is returned.
[WebMethod]
public Member AuthenticateUser(string UserName, string Password)
{
//check that the username doesn't already exist
return authenticateUser(UserName, Password);
}
private Member authenticateUser(string UserName, string Password)
{
conn.Open();
SqlCommand comm = new SqlCommand("select fullname, emailaddress from User where username = @username AND password = @password",conn);
SqlParameter pUserName = new SqlParameter("@username",UserName);
SqlParameter pPassword = new SqlParameter("@password",Password);
comm.Parameters.Add(pUserName);
comm.Parameters.Add(pPassword);
SqlDataReader r = comm.ExecuteReader();
bool result = r.HasRows;
conn.Close();
if (result)
{
//build a new member object
Member m = new Member();
m.UserName = UserName;
m.Password = Password;
m.FullName = r.GetString(0);
m.EmailAddress = r.GetString(1);
return m;
}
return null;
}
Click here to download the Web Service file. To deploy the service, copy it to your Web application (either through FTP, or by adding it to your Project in Visual Studio.NET)
Designing the User Controls
We can build user controls to encapsulate the creation and authentication of a user in our system. User controls are, in essence, encapsulated areas of a page that you can drop into Web forms to allow the quick reuse of your code. For example, here, we'll be creating Login and Register User forms, both of which we'll place inside a user control file. To use either the login or the registration forms, we'd simply drag and drop (or, if we're not using Visual Studio, reference) the controls onto our pages. Read the MSDN entry for User Controls for more information.
The createUser user control can be placed within a Web Form to offer the automatic registration of a user. The control includes text boxes that allow users to input usernames, passwords, email addresses, and full names.
In the click event of the register button, we call the Web service LogIn, created above, to create the user, and check to see if the procedure was successful or not. If the creation was successful, we redirect to a new page that tells the user what to do next. Otherwise, a previously hidden Label control containing an error message is made visible, and the user tries again.
You can find the completed createUser.ascx file in the code archive. Worthy of note, however, is the click event for the button on our control (the code that's run when the user clicks Register).
Here, the code grabs the information that's input by the user, and fills a Member object, created earlier, with the details:
Sitepoint.SingleLogIn.Member m = new Member();
m.UserName = txtUserName.Text;
m.Password = System.Web.Security.FormsAuthentication.
HashPasswordForStoringInConfigFile(txtPassword.Text, "sha1");
m.FullName = txtFullName.Text;
m.EmailAddress = txtEmailAddress.Text;
We then create an instance of our login service and pass our new member object to it to register the user. If this is successful, we can redirect users to a page that informs them that their registration has been successful. Otherwise, we can show the previously hidden error label, which asks the user to try a different username.
Sitepoint.SingleLogIn.login login = new Sitepoint.SingleLogIn.login();
if (login.createUser(m))
{
//success. user created.
//in this example, we redirect to the success page
Response.Redirect("success.aspx",true);
}
else
{
//try again.
lblError.Visible = true;
}
The authenticateUser user control is very similar to the createUser control; however, when authentication is successful, we set a session cookie to store the Member object we retrieved from the authentication method. In future, we can check to see if this object exists within our cache, and thereby ascertain whether the current user is logged in or not.
Again, you can find the completed authenicateUser.ascx file in the code archive.
This time, we wish to authenticate a user, so we take the username and password input by the user, and with them retrieve the appropriate member object from our Web service:
Sitepoint.SingleLogIn.login l = new Sitepoint.SingleLogIn.login();
Sitepoint.SingleLogIn.Member m = l.AuthenticateUser(txtUserName.Text, System.Web.Security.FormsAuthentication.HashPasswordForStoringInConfigFile(txtPassword.Text, "sha1"));
If no member object is returned (i.e. m is null), then no user was found with that username and password combination. If this is the case, we show the error label, and ask the user to try again.
if (m == null)
{
//not authenticated
lblError.Visible = true;
return;
}
Otherwise, we now have an authenticated user. The member object is added to the session state (we can retrieve this through our application at a later time), and an authenticated variable is set to true. This provides a quick method of ascertaining whether a user is authenticated (comparing a Boolean value is much quicker and more efficient than comparing an object to null):
// authenticated
Session["user"] = m;
Session["authenticated"] = true;
Response.Redirect("homepage.aspx");
Using the Login System
It's time to put our code to use!
Using Visual Studio.NET
- In the Web application with which you wish to use your login system, add a Web reference to the Login Web service and add the user controls to the project.
- Drag and drop the user controls onto the forms with which you wish to log in or create a user.
Without .NET
- Upload the login.asmx and your 2 user control files to your Web application directory.
- Create a Web service proxy class to the login.asmx service. When compiling the application, make sure you add this proxy class into the command line.
- In Web forms with which you wish to use the UserControls, add a directive at the top of the form code.
- To use the controls within your page, add the following tag for the registration control:
For the registration (createUser) control, add:
<%@ Register TagPrefix="uc1" TagName="createUser" Src="createUser.ascx" %>
For the login (authenticateUser) control, add:
<%@ Register TagPrefix="uc1" TagName="authenticateUser" Src="authenticateUser.ascx" %>
<uc1:createUser id="CreateUser1" runat="server"></uc1:createUser>
Add the tag below for the login (authenticateUser) control:
<uc1:authenticateUser id="AuthenticateUser1" runat="server"></uc1:authenticateUser>
Now, if you need to ascertain whether the current session is logged in, you can check the Session object to see if a user object exists, like so:
if (Session["user"] != null)
{
//logged in
}
else
{
//no user
}
And, to log out a user, remove the user object from the Session object, as follows:
Session.Remove("user");
Summary
By encapsulating code within Web services and user controls, you can easily make repetitive tasks such as user management simpler to manage. And, by sharing the login system across your sites, not only can you share your membership, you also share the code behind the system, making any updates appear seamlessly across your network.
ASP.NET Single Sign On
Single Sign-On (SSO) is a hot topic these days. Most clients I worked with have more than one web application running under different versions of .NET framework in different subdomains, or even in different domains and they want to let the user login once and stay logged in when switching to a different web site. Today we will implement SSO and see if we can make it work in different scenarios. We will start with a simple case and gradually build upon it:
- SSO for parent and child application in the virtual sub-directory
- SSO using different authorization credentials (username mapping)
- SSO for two applications in two sub-domains of the same domain
- SSO when applications run under different versions of .NET
- SSO for two applications in different domains.
- SSO for mixed-mode authentication (Forms and Windows)
1. SSO for parent and child application in the virtual sub-directory
Lets assume that we have two .NET applications - Foo and Bar, and Bar is running in a virtual sub-directory of Foo (http://foo.com/bar). Both applications implement Forms authentication. Implementation of Forms authentication requires you to override the Application_AuthenticateRequest, where you perform the authentication and upon successful authentication, call FormsAuthentication.RedirectFromLoginPage, passing in the logged-in user name (or any other piece of information that identifies the user in the system) as a parameter. In ASP.NET the logged-in user status is persisted by storing the cookie on the client computer. When you call RedirectFromLoginPage, a cookie is created which contains an encrypted FormsAuthenticationTicket with the name of the logged-in user . There is a section in web.config that defines how the cookie is created:
<authentication mode="Forms">
<forms name=".FooAuth" protection="All" timeout="60" loginUrl="login.aspx" />
</authentication>
<authentication mode="Forms">
<forms name=".BarAuth" protection="All" timeout="60" loginUrl="login.aspx" />
</authentication>
The important attributes here are name and protection. If you make them match for both Foo and Bar applications, they will both write and read the same cookie using the same protection level, effectively providing SSO:
<authentication mode="Forms">
<forms name=".SSOAuth" protection="All" timeout="60" loginUrl="login.aspx" />
</authentication>
When protection attribute is set to "All", both encryption and validation (via hash) is applied to the cookie. The default validation and encryption keys are stored in the machine.config file and can be overridden in the application’s web.config file. The default value is this:
<machineKey validationKey="AutoGenerate,IsolateApps" decryptionKey=" AutoGenerate,IsolateApps" validation="SHA1" />
IsolateApps means that a different key will be generated for every application. We can’t have that. In order for the cookie to be encrypted and decrypted with the same key in all applications either remove the IsolateApps option or better yet, add the same concrete key to the web.config of all applications using SSO:
<machineKey validationKey="F9D1A2D3E1D3E2F7B3D9F90FF3965ABDAC304902" decryptionKey="F9D1A2D3E1D3E2F7B3D9F90FF3965ABDAC304902F8D923AC" validation="SHA1" />
If you are authenticating against the same users store, this is all it takes – a few changes to the web.config files.
2. SSO using different authorization credentials (username mapping)
But what if the Foo application authenticates against its own database and the Bar application uses Membership API or some other form of authentication? In this case the automatic cookie that is created on the Foo is not going to be any good for the Bar, since it will contain the user name that makes no sense to the Bar.
To make it work, you will need to create the second authentication cookie especially for the Bar application. You will also need a way to map the Foo user to the Bar user. Lets assume that you have a user "John Doe" logging in to the Foo application and you determined that this user is identified as "johnd" in the Bar application. In the Foo authentication method you will add the following code:
FormsAuthenticationTicket fat = new FormsAuthenticationTicket(1, "johnd", DateTime.Now, DateTime.Now.AddYears(1), true, "");
HttpCookie cookie = new HttpCookie(".BarAuth");
cookie.Value = FormsAuthentication.Encrypt(fat);
cookie.Expires = fat.Expiration;
HttpContext.Current.Response.Cookies.Add(cookie);
FormsAuthentication.RedirectFromLoginPage("John Doe");
User names are hard-coded for demonstration purposes only. This code snippet creates the FormsAuthenticationTicket for the Bar application and stuffs it with the user name that makes sense in the context of the Bar application. And then it calls RedirectFromLoginPage to create the correct authentication cookie for the Foo application. If you changed the name of forms authentication cookie to be the same for both applications (see our previous example), make sure that they are different now, since we are not using the same cookie for both sites anymore:
<authentication mode="Forms">
<forms name=".FooAuth" protection="All" timeout="60" loginUrl="login.aspx" slidingExpiration="true"/>
</authentication>
<authentication mode="Forms">
<forms name=".BarAuth" protection="All" timeout="60" loginUrl="login.aspx" slidingExpiration="true"/>
</authentication>
Now when the user is logged in to Foo, he is mapped to the Bar user and the Bar authentication ticket is created along with the Foo authentication ticket. If you want it to work in the reverse direction, add similar code to the Bar application:
FormsAuthenticationTicket fat = new FormsAuthenticationTicket(1, "John Doe", DateTime.Now, DateTime.Now.AddYears(1), true, "");
HttpCookie cookie = new HttpCookie(".FooAuth");
cookie.Value = FormsAuthentication.Encrypt(fat);
cookie.Expires = fat.Expiration;
HttpContext.Current.Response.Cookies.Add(cookie);
FormsAuthentication.RedirectFromLoginPage("johnd");
Also make sure that you have the <machineKey> element in web.config of both applications with matching validation and encryption keys.
3. SSO for two applications in two sub-domains of the same domain
Now what if Foo and Bar are configured to run under different domains http://foo.com and http://bar.foo.com. The code above will not work because the cookies will be stored in different files and will not be visible to both applications. In order to make it work, we will need to create domain-level cookies that are visible to all sub-domains. We can’t use RedirectFromLoginPage method anymore, since it doesn’t have the flexibility to create a domain-level cookie. So we do it manually:
FormsAuthenticationTicket fat = new FormsAuthenticationTicket(1, "johnd", DateTime.Now, DateTime.Now.AddYears(1), true, "");
HttpCookie cookie = new HttpCookie(".BarAuth");
cookie.Value = FormsAuthentication.Encrypt(fat);
cookie.Expires = fat.Expiration;
cookie.Domain = ".foo.com";
HttpContext.Current.Response.Cookies.Add(cookie);
FormsAuthenticationTicket fat = new FormsAuthenticationTicket(1, "John Doe", DateTime.Now, DateTime.Now.AddYears(1), true, "");
HttpCookie cookie = new HttpCookie(".FooAuth");
cookie.Value = FormsAuthentication.Encrypt(fat);
cookie.Expires = fat.Expiration;
cookie.Domain = ".foo.com";
HttpContext.Current.Response.Cookies.Add(cookie);
Note the highlighted lines. By explicitly setting the cookie domain to ".foo.com" we ensure that this cookie will be visible in both http://foo.com and http://bar.foo.com or any other sub-domain. You can also specifically set the Bar authentication cookie domain to "bar.foo.com". It is more secure, since other sub-domains can’t see it now. Also notice that RFC 2109 requires two periods in the cookie domain value, therefore we add a period in the front – ".foo.com"
Again, make sure that you have the same <machineKey> element in web.config of both applications. There is only one exception to this rule and it is explained in the next secion.
4. SSO when applications run under different versions of .NET
It is possible that Foo and Bar applications run under different version of .NET. In this case the above examples will not work. It turns out that ASP.NET 2.0 is using a different encryption method for authorization tickets. In ASP.NET 1.1 it was 3DES, in ASP.NET 2.0 it is AES. Fortunately, a new attribute was introduced in ASP.NET 2.0 for backwards compatibility
<machineKey validationKey="F9D1A2D3E1D3E2F7B3D9F90FF3965ABDAC304902" decryptionKey="F9D1A2D3E1D3E2F7B3D9F90FF3965ABDAC304902F8D923AC" validation="SHA1" decryption="3DES" />
Setting decryption="3DES" will make ASP.NET 2.0 use the old encryption method, making the cookies compatible again. Don’t try to add this attribute to the web.config of the ASP.NET 1.1 application. It will cause an error.
5. SSO for two applications in different domains.
We’ve been quite successful creating shared authentication cookies so far, but what if Foo and Bar are in different domains – http://foo.com and http://bar.com? They cannot possibly share a cookie or create a second cookie for each other. In this case each site will need to create its own cookies, and call the other site to verify if the user is logged in elsewhere. One way to do it is via a series of redirects.
In order to achieve that, we will create a special page (we’ll call it sso.aspx) on both web sites. The purpose of this page is to check if the cookie exists in its domain and return the logged in user name, so that the other application can create a similar cookie in its own domain. This is the sso.aspx from Bar.com:
<%@ Page Language="C#" %>
<script language="C#" runat="server">
void Page_Load()
{
// this is our caller, we will need to redirect back to it eventually
UriBuilder uri = new UriBuilder(Request.UrlReferrer);
HttpCookie c = HttpContext.Current.Request.Cookies[".BarAuth"];
if (c != null && c.HasKeys) // the cookie exists!
{
try
{
string cookie = HttpContext.Current.Server.UrlDecode(c.Value);
FormsAuthenticationTicket fat = FormsAuthentication.Decrypt(cookie);
uri.Query = uri.Query + "&ssoauth=" + fat.Name; // add logged-in user name to the query
}
catch
{
}
}
Response.Redirect(uri.ToString()); // redirect back to the caller
}
</script>
This page always redirects back to the caller. If the authentication cookie exists on Bar.com, it is decrypted and the user name is passed back in the query string parameter ssoauth.
On the other end (Foo.com), we need to insert some code into the http request processing pipeline. It can be in Application_BeginRequest event or in a custom HttpHandler or HttpModule. The idea is to intercept all page requests to Foo.com as early as possible to verify if authentication cookie exists:
1. If authentication cookie exists on Foo.com, continue processing the request. User is logged in on Foo.com
2. If authentication cookie doesn’t exist, redirect to Bar.com/sso.aspx.
3. If the current request is the redirect back from Bar.com/sso.aspx, analyse the ssoauth parameter and create an authentication cookie if necessary.
It looks pretty simple, but we have to watch out for infinite loops:
// see if the user is logged in
HttpCookie c = HttpContext.Current.Request.Cookies[".FooAuth"];
if (c != null && c.HasKeys) // the cookie exists!
{
try
{
string cookie = HttpContext.Current.Server.UrlDecode(c.Value);
FormsAuthenticationTicket fat = FormsAuthentication.Decrypt(cookie);
return; // cookie decrypts successfully, continue processing the page
}
catch
{
}
}
// the authentication cookie doesn't exist - ask Bar.com if the user is logged in there
UriBuilder uri = new UriBuilder(Request.UrlReferrer);
if (uri.Host != "bar.com" || uri.Path != "/sso.aspx") // prevent infinite loop
{
Response.Redirect( http://bar.com/sso.aspx);
}
else
{
// we are here because the request we are processing is actually a response from bar.com
if (Request.QueryString["ssoauth"] == null)
{
// Bar.com also didn't have the authentication cookie
return; // continue normally, this user is not logged-in
} else
{
// user is logged in to Bar.com and we got his name!
string userName = (string)Request.QueryString["ssoauth"];
// let's create a cookie with the same name
FormsAuthenticationTicket fat = new FormsAuthenticationTicket(1, userName, DateTime.Now, DateTime.Now.AddYears(1), true, "");
HttpCookie cookie = new HttpCookie( ".FooAuth");
cookie.Value = FormsAuthentication.Encrypt(fat);
cookie.Expires = fat.Expiration;
HttpContext.Current.Response.Cookies.Add(cookie);
}
}
The same code should be placed on both sites, just make sure you are using correct cookie names (.FooAuth vs. .BarAuth) on each site. Since the cookie is not actually shared, the applications can have different <machineKey> elements. It is not necessary to synchronize the encryption and validation keys.
Some of us may cringe at the security implications of passing the user name in the query string. A couple of things can be done to protect it. First of all we are checking the referrer and we will not accept the ssoauth parameter from any source other then bar.com/sso.aspx (or foo.com/ssp.aspx). Secondly, the name can easily be encrypted with a shared key. If Foo and Bar are using different authentication mechanisms, additional user information (e.g. e-mail address) can be passed along similarly.
6. SSO for mixed-mode authentication (Forms and Windows)
So far we have dealt with Forms authentication only. But what if we want to authenticate Internet users via Forms authentication first and if it fails, check if the Intranet user is authenticated on the NT domain? In theory we can check the following parameter to see if there is a Windows logon associated with the request:
Request.ServerVariables["LOGON_USER"]
However, unless our site has Anonymous Access disabled, this value is always empty. We can disable Anonymous Access and enable Integrate Windows Authentication for our site in the IIS control panel. Now the LOGON_USER value contains the NT domain name of the logged in Intranet user. But all Internet users get challenged for the Windows login name and password. Not cool. We need to be able to let the Internet users login via Forms authentication and if it fails, check their Windows domain credentials.
One way to solve this problem is to have a special entry page for Intranet users that has Integrate Windows Authentication enabled, validates the domain user, creates a Forms cookie and redirects to the main web site. We can even conceal the fact that Intranet users are hitting a different page by making a Server.Transfer.
There is also an easier solution. It works because of the way IIS handles the authentication process. If anonymous access is enabled for a web site, IIS is passing requests right through to the ASP.NET runtime. It doesn’t attempt to perform any kind of authentication. However, if the request results in an authentication error (401), IIS will attempt an alternative authentication method specified for this site. You need to enable both Anonymous Access and Integrated Windows Authentication and execute the following code if Forms authentication fails:
if (System.Web.HttpContext.Current.Request.ServerVariables["LOGON_USER"] == "") {
System.Web.HttpContext.Current.Response.StatusCode = 401;
System.Web.HttpContext.Current.Response.End();
}
else
{
// Request.ServerVariables[ "LOGON_USER"] has a valid domain user now!
}
When this code executes, it will check the domain user and will get an empty string initially. It will then terminate the current request and return the authentication error (401) to IIS. This will make the IIS use the alternative authentication mechanism, which in our case is Integrated Windows Authentication. If the user is already logged in to the domain, the request will be repeated, now with the NT domain user information filled-in. If the user is not logged in to the domain, he will be challenged for the Windows name/password up to 3 times. If the user cannot login after the third attempt, he will get the 403 error (access denied).
Conclusion
We have examined various scenarios of Single Sign-On for two ASP.NET applications. It is also quite possible to implement SSO for heterogeneous systems spawning across different platforms. Ideas remain the same, but the implementation may require some creative thinking.
Wednesday, August 09, 2006
ThinkPad X32 can't run IPCONFIG
* ThinkPad X32 can't run IPCONFIG
* When running ipconfig in the command line, an error message appeared as follow
c:\ipconfig /all
Windows IP Configuration
An internal error occurred: A device attached to the system is not
functioning.
Please contact Microsoft Product Support Services for further help.
Additional information: Unknown media status code.
Solution:
http://support.microsoft.com/default.aspx?scid=kb;en-us;239924
1. Use Registry Editor (Regedt32.exe) to view the following key in the registry:
HKEY_LOCAL_MACHINE\System\CurrentControlSet\Services\Tcpip\Parameters
Add the following registry value:
Value Name: DisableDHCPMediaSense
Data Type: REG_DWORD -Boolean
Value Data Range: 0, 1 (False, True) Default: 0 (False)
Description: This parameter controls DHCP Media Sense behavior. If you set this value data to 1, DHCP, and even non-DHCP, clients ignore Media Sense events from the interface. By default, Media Sense events trigger the DHCP client to take an action, such as attempting to obtain a lease (when a connect event occurs), or invalidating the interface and routes (when a disconnect event occurs).
2. Restart your computer.
Friday, February 10, 2006
Email validation for PHP
Here is the function to validate an email address with PHP.
It will check whether the domain has a valid mx record or not.
function validate_email($email)
{
// regular expression validation for email address
$regexp = "^([_a-z0-9-]+)(\.[_a-z0-9-]+)*@([a-z0-9-]+)(\.[a-z0-9-]+)*(\.[a-z]{2,4})$";
$valid = 0;
// Validate the syntax
if (eregi($regexp, $email))
{
list($username,$domaintld) = split("@",$email);
// Validate the domain
if (getmxrr($domaintld,$mxrecords))
$valid = 1;
} else {
$valid = 0;
}
return $valid;
}
Subscribe to:
Posts (Atom)