Most of today's sites require users to undertake a registration process to allow the site owners to keep in touch with, or offer services to, those visitors. Building up a user base like this requires patience and dedication. Offer a new service or a new Website, however, and, typically, you'll need to start your user base from scratch yet again.
This article outlines a strategy for creating portable membership tools. We'll see how Web Services and server controls give you ability to produce a single sign-in for all your sites and resources.
The Challenge
The notion of a single sign-in for a Website has been around for years. Most notably, Microsoft's implementation in the form of the .NET Passport, and the Liberty Alliance Project (backed by big hitters like Visa and GM), have had moderate success in saving users and developers from the issues of site membership.
However, the license fees of systems like Passport put it out of the reach of many Web developers. Passport, for example, costs $10,000 a year and an additional $1,500 compliance fee per URL.
While the tools outlined in this article won't give you all the advantages of using Passport (most notably, Passport's 200 million-strong user base, or its security), the solution we'll discuss does offer a simple method of organising your user base over multiple sites or resources.
Architecture
The design of the tools needs to be such that we can create separate applications -- even non-.NET applications -- and still access and authenticate our user base.
Web Services
The heart of the login system is a Web service. A Web service allows you to extract and distribute specific functionality of your applications so that it can be reused by other applications, even if they aren't written in .NET. This provides the perfect platform for our login system, affording us the flexibility to produce some of our sites as non-.NET applications; for example, PHP, ASP, or JSP. We can even write desktop applications to include our login functionality.
Database Design
A database will contain information for all our users, and is queried by the Web service to authenticate, locate, and return users to our applications. As only the Web service will communicate with the database directly, our applications will not need to know how to access the database, nor deal with SQL statements.
The Member Object
The Web service will use a Member object defined by us to represent a user of our site. This object will give us access to the details of the currently signed-in user.
User Controls
After we produce our Web service, we can build some ASP.NET user controls that encapsulate the common functionality of user registration and authentication. The user controls will communicate with the Web service, presenting us with simple properties and events to control the membership of our site.
Designing the Login Web Service
The Web service needs to encapsulate all the functionality we'll require to register and authenticate a user; hence it will require the following methods:
bool createUser(Member m)
Member authenticateUser(string userName, string password)
Of course, this isn't all the functionality that's possible. We could, for example, have methods to control the modification of a user, the loss of a password, or the removal of a user from our system. However, this article will concentrate on creation and authentication.
Both of the methods reference an object, Member. This class will represent a user; it contains all the information we know about the user we're dealing with. The class will have the following properties:
string userName;
string hashedPassword;
string emailAddress;
string fullName;
Here's the C# source code for this class. There's nothing fancy here, just code for the four properties:
namespace Sitepoint.SingleLogIn
{
public class Member
{
private string _UserName;
private string _Password;
private string _FullName;
private string _EmailAddress;
public string UserName
{
get
{
return _UserName;
}
set
{
_UserName = value;
}
}
public string Password
{
get
{
return _Password;
}
set
{
_Password = value;
}
}
public string EmailAddress
{
get
{
return _EmailAddress;
}
set
{
_EmailAddress = value;
}
}
public string FullName
{
get
{
return _FullName;
}
set
{
_FullName = value;
}
}
}
}
To create a user on our system, we first create an instance of the Member class and fill it with the personal information for the user. We then pass this to the createUser method on the Web service. This returns true for a successful addition, and false if a problem is found with the information (for example, if the username already exists).
To authenticate a user, we pass that user's username and password to the Web service and, if these details are authenticated, a Member object representing the user is returned.
A database table will be used to store our user details. The fields of this table will correspond to the user information:
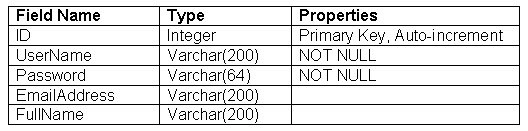
Hence, the SQL we'll use to create the table is as follows:
CREATE TABLE User
{
ID int IDENTITY (1,1) NOT NULL,
UserName varchar(200) NOT NULL,
Password varchar(64) NOT NULL,
EmailAddress varchar(200),
FullName varchar(200)
}
With the database created, and our Member class coded, we can now flesh out the methods in the Web service to include our functionality.
The createUser method will first check to see if the username contained within the passed Member object has been registered before (implemented in the private method userExists). If it has, the method will return false. If all is well, however, the user can be added to the database (through the private method addUser).
All passwords are stored as hashes of the original password for the sake of security. As we'll see with the server controls, this functionality is encapsulated. However, if we weren't using the controls -- say we created a non-.NET or desktop application – we'd need to remember that plain text passwords cannot be passed over the network connection.
[WebMethod]
public bool createUser(Member m)
{
//check that the username doesn't already exist
if (!userExists(m.UserName))
{
return false;
}
//add the user
if (!addUser(m))
{
return false;
}
return true;
}
private bool userExists(string UserName)
{
conn.Open();
SqlCommand comm = new SqlCommand("select id from User where username = @username",conn);
SqlParameter p = new SqlParameter("@username",UserName);
comm.Parameters.Add(p);
SqlDataReader r = comm.ExecuteReader();
bool result = r.HasRows;
conn.Close();
return result;
}
private bool addUser(Member m)
{
conn.Open();
SqlCommand comm = new SqlCommand("insert into User(UserName, Password, FullName, EmailAddress) values (@username, @password, @fullname, @emailaddress)",conn);
SqlParameter pUserName = new SqlParameter("@username",m.UserName);
SqlParameter pPassword = new SqlParameter("@password",m.Password);
SqlParameter pFullName = new SqlParameter("@fullname",m.FullName);
SqlParameter pEmailAddress = new SqlParameter("@emailaddress",m.EmailAddress);
comm.Parameters.Add(pUserName);
comm.Parameters.Add(pPassword);
comm.Parameters.Add(pFullName);
comm.Parameters.Add(pEmailAddress);
int result = comm.ExecuteNonQuery();
//we should have 1 result returned. else, it failed
return (result ==1);
}
The authenticateUser method is the meat of our service. By passing a username and a hashed password of the user (taken from a Web form, for example) a Member object that represents the user is returned. The method queries the database to see if a row exists that contains both the username and the password. If a row is found, the user is authenticated, and the object is created from the row. Otherwise, we've been given incorrect credentials, and a null is returned.
[WebMethod]
public Member AuthenticateUser(string UserName, string Password)
{
//check that the username doesn't already exist
return authenticateUser(UserName, Password);
}
private Member authenticateUser(string UserName, string Password)
{
conn.Open();
SqlCommand comm = new SqlCommand("select fullname, emailaddress from User where username = @username AND password = @password",conn);
SqlParameter pUserName = new SqlParameter("@username",UserName);
SqlParameter pPassword = new SqlParameter("@password",Password);
comm.Parameters.Add(pUserName);
comm.Parameters.Add(pPassword);
SqlDataReader r = comm.ExecuteReader();
bool result = r.HasRows;
conn.Close();
if (result)
{
//build a new member object
Member m = new Member();
m.UserName = UserName;
m.Password = Password;
m.FullName = r.GetString(0);
m.EmailAddress = r.GetString(1);
return m;
}
return null;
}
Click here to download the Web Service file. To deploy the service, copy it to your Web application (either through FTP, or by adding it to your Project in Visual Studio.NET)
Designing the User Controls
We can build user controls to encapsulate the creation and authentication of a user in our system. User controls are, in essence, encapsulated areas of a page that you can drop into Web forms to allow the quick reuse of your code. For example, here, we'll be creating Login and Register User forms, both of which we'll place inside a user control file. To use either the login or the registration forms, we'd simply drag and drop (or, if we're not using Visual Studio, reference) the controls onto our pages. Read the MSDN entry for User Controls for more information.
The createUser user control can be placed within a Web Form to offer the automatic registration of a user. The control includes text boxes that allow users to input usernames, passwords, email addresses, and full names.
In the click event of the register button, we call the Web service LogIn, created above, to create the user, and check to see if the procedure was successful or not. If the creation was successful, we redirect to a new page that tells the user what to do next. Otherwise, a previously hidden Label control containing an error message is made visible, and the user tries again.
You can find the completed createUser.ascx file in the code archive. Worthy of note, however, is the click event for the button on our control (the code that's run when the user clicks Register).
Here, the code grabs the information that's input by the user, and fills a Member object, created earlier, with the details:
Sitepoint.SingleLogIn.Member m = new Member();
m.UserName = txtUserName.Text;
m.Password = System.Web.Security.FormsAuthentication.
HashPasswordForStoringInConfigFile(txtPassword.Text, "sha1");
m.FullName = txtFullName.Text;
m.EmailAddress = txtEmailAddress.Text;
We then create an instance of our login service and pass our new member object to it to register the user. If this is successful, we can redirect users to a page that informs them that their registration has been successful. Otherwise, we can show the previously hidden error label, which asks the user to try a different username.
Sitepoint.SingleLogIn.login login = new Sitepoint.SingleLogIn.login();
if (login.createUser(m))
{
//success. user created.
//in this example, we redirect to the success page
Response.Redirect("success.aspx",true);
}
else
{
//try again.
lblError.Visible = true;
}
The authenticateUser user control is very similar to the createUser control; however, when authentication is successful, we set a session cookie to store the Member object we retrieved from the authentication method. In future, we can check to see if this object exists within our cache, and thereby ascertain whether the current user is logged in or not.
Again, you can find the completed authenicateUser.ascx file in the code archive.
This time, we wish to authenticate a user, so we take the username and password input by the user, and with them retrieve the appropriate member object from our Web service:
Sitepoint.SingleLogIn.login l = new Sitepoint.SingleLogIn.login();
Sitepoint.SingleLogIn.Member m = l.AuthenticateUser(txtUserName.Text, System.Web.Security.FormsAuthentication.HashPasswordForStoringInConfigFile(txtPassword.Text, "sha1"));
If no member object is returned (i.e. m is null), then no user was found with that username and password combination. If this is the case, we show the error label, and ask the user to try again.
if (m == null)
{
//not authenticated
lblError.Visible = true;
return;
}
Otherwise, we now have an authenticated user. The member object is added to the session state (we can retrieve this through our application at a later time), and an authenticated variable is set to true. This provides a quick method of ascertaining whether a user is authenticated (comparing a Boolean value is much quicker and more efficient than comparing an object to null):
// authenticated
Session["user"] = m;
Session["authenticated"] = true;
Response.Redirect("homepage.aspx");
Using the Login System
It's time to put our code to use!
Using Visual Studio.NET
- In the Web application with which you wish to use your login system, add a Web reference to the Login Web service and add the user controls to the project.
- Drag and drop the user controls onto the forms with which you wish to log in or create a user.
Without .NET
- Upload the login.asmx and your 2 user control files to your Web application directory.
- Create a Web service proxy class to the login.asmx service. When compiling the application, make sure you add this proxy class into the command line.
- In Web forms with which you wish to use the UserControls, add a directive at the top of the form code.
- To use the controls within your page, add the following tag for the registration control:
For the registration (createUser) control, add:
<%@ Register TagPrefix="uc1" TagName="createUser" Src="createUser.ascx" %>
For the login (authenticateUser) control, add:
<%@ Register TagPrefix="uc1" TagName="authenticateUser" Src="authenticateUser.ascx" %>
<uc1:createUser id="CreateUser1" runat="server"></uc1:createUser>
Add the tag below for the login (authenticateUser) control:
<uc1:authenticateUser id="AuthenticateUser1" runat="server"></uc1:authenticateUser>
Now, if you need to ascertain whether the current session is logged in, you can check the Session object to see if a user object exists, like so:
if (Session["user"] != null)
{
//logged in
}
else
{
//no user
}
And, to log out a user, remove the user object from the Session object, as follows:
Session.Remove("user");
Summary
By encapsulating code within Web services and user controls, you can easily make repetitive tasks such as user management simpler to manage. And, by sharing the login system across your sites, not only can you share your membership, you also share the code behind the system, making any updates appear seamlessly across your network.

No comments:
Post a Comment